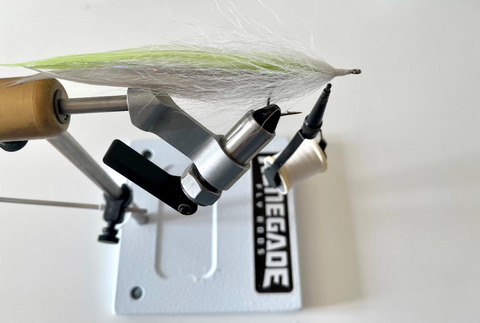
The Lefty’s Deceiver is a staple pattern designed and tied by fly fishing OG Lefty Kreh. If you don’t know who Lefty is, Isuggest you look him up before going any further in fly fishing. His famous pattern the “Lefty’s Deceiver” has evolvedinto countlessvariations over the years and has really just served as a platform to base an entire style of fly after. I’vebeen tying my variation for a few years now and I endlessly find myself tweaking things on it to make the fly performhow I want in the water. This is hands-down my number one producing Striped Bass (stripers for those not familiarwiththese amazing fish) fly over the past few years. I like to tie it in every color combination possible and in a wide variety ofsizes, since stripers like to eat everything from the tiniest of baitfish, all the way to foot long plus bunker. I sometimes fish this fly without any eyes and sometimes with eyes and a resin head, either way this fly CRUSHES it. The combinationof profile and movement, pretty much guarantees an eat from a striper if they’re in the area...and that can meananything from an 18” schoolieor a 30-pounder. This is a fun tie with plenty of nuance for you to experiment with, so goahead and make this fly your own!
Materials
Hook–any strong saltwater hook will work (I used an Eagle Claw L253, size 4/0)
Thread–Danville 210 Denier FlatWaxed (white)
Body–Good quality Bucktail (white)
Hackle–Whiting Farms Bugger Packs (Light Duh & Chartreuse)
Flash–Larva Lace Angel Hair (Holographic Silver)
Head–EP Craftfur Brush (White/Chartreuse)

As with most striper flies, bucktail is king. I personally like to source my bucktail from individuals who specialize in quality bucktails in unique colors. This can get tedious, but you end up getting the highest quality tails for the most cost-effective price. With that being said, you can also just buy prepackaged bucktails from your local fly shop, just be sure to look for tails with the longest, softest fibers that have a subtle wave or crinkle to the individual fibers. The better the bucktail, the better your fly will look.

Start by wrapping your thread back towards the bend, just above the barb. Take a sparse, pencil thick clump of the longest fibers on your bucktail, and tie those in tightly just in front of the bend of the hook. Use your thumb to gently spread the fibers around the shank of the hook. Working with bucktail takes some time to get used to, but the only way to improve your dexterity needed is to practice, so don’t be afraid to tie ugly flies.

Next, take a total of four of the white hackles and tie them just in front of where you tied in the bucktail, two to each side. I like to layer a shorter hackle on top of a longer, thinner hackle on each side. In order to get the hackles to lay flat, use loose wraps of your thread at first, and gradually use more pressure as you work forward.

Take another clump of bucktail (remember, sparse is always key when working with bucktail) and tie it about a quarter inch or so in front of the hackles, keeping your thread loose. Now, use your thumb to spread the fibers 360°around the shank of the hook. Once the fibers are even, use your thumb and forefinger to squeeze the fiber against the hook shank. As you do this, pull your thread tight with multiple wraps. This forces the fibers slightly to the top and bottom of the shank, giving the fly a wider baitfish profile. Don’t worry, this will definitely take some practice. Add some of the angel hair in a similar way to how you added the bucktail.

Now take 3 or 4 of the chartreuse hackles and tie them in similarly to how you tied the white hackles, except tie them in towards the top of the fly. This will give the fly the countershading look of almost all baitfish. I like these hackles to be just a bit longer than the white ones. This will continue to add to the tapered shape of the fly.
Take another clump of bucktail and tie it in exactly how you tied in the last clump of bucktail. These fibers should be a bit shorter than the last bucktail fibers you tied in.

Lastly, take your EP craftfur brush and tie it in front of the last bucktail station. Wrap the brush forward, ensuring tight, touching wraps. This will give the fly a dense head which will push water and give more action to the rear of the fly. With flies of this style, you generally want more mass at the front of the fly and less at the rear. This can be accomplished using different styles of tying bucktail in at the head, but I like to use either an EP craftfur bush (as used here) or an EP Foxy brush since both of these brushes incorporate a denser core fiber and a thinner, wispy material that extends towards the rear of the fly. The denser the head of the fly, the more water it will push, which is really the name of the game for predatory fish. Whip finish and add some UV resin, or similar. I sometimes add eyes and a UV resin head to these, but I don’t find that to always be necessary. One last thing I always like to do with any of my bucktail flies, is to get the fly wet and hang dry it. This locks in the shape you’re looking for and tames any of those wild bucktail fibers.

If I could only have one striper fly, this would be it. This size and this color combination is always money and is definitely my confidence fly. Go tie some up and see why!
Photography and Written by Ryan Gallagher of https://www.instagram.com/blueoliveflyco/

Follow Ryan's Instagram Below: